Since this is a beginner's tutorial, it is written assuming the reader has never used Maya. If you have, you may want to skip down to the actual modeling section.
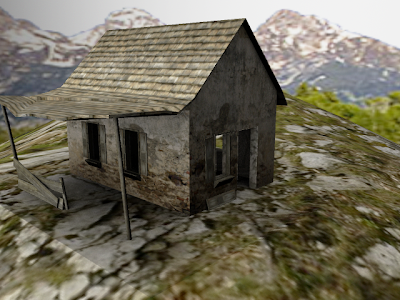

I realize that I’m going to be moving very quickly in class today, so here is a step by step guide if you get a little behind:
Before we start, just know that when starting out, Maya can be very daunting. Not to worry! Making 3D stuff is fun as long as you understand you won’t be making Shrek on your first day.
Ok first thing first: open Maya.
Now that Maya is open, you have a slew of menus at the top of the screen, tons of icons in multiple trays, and a tool box on the left. Lets learn how to use the view panes.
Navigating the View-panes
Alright, in front of you should be a big window with a grid in it. This is the perspective window (labeled “persp” in green at the bottom). Let’s learn how to Rotate, Pan, and Zoom the persp camera. It’s easy!
Hold down alt (or cmd on mac),
Left click drag to rotate
Middle click drag to pan
Right click drag to zoom
In the future, this may not be good enough for modeling. We need orthographic views! Under the toolbox on the left side of Maya, find the icons for the different Maya layouts.
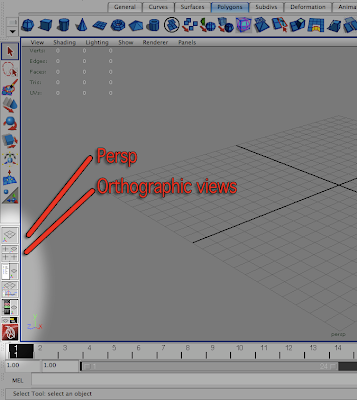 Choose the Orthographic (Ortho) views. Your screen should be split into four windows now: top, persp, front, side. Excellent, this should make modeling easier. But we don’t need to be in this viewmode all the time, so mouse over the persp window and tap the spacebar.
Shortcut: tapping spacebar will maximize whatever view you were moused over in orthographic viewmode, or return you to orthographic view mode.
Now that you know how to manipulate the camera, and move through the different view modes, let’s learn how to create, translate, rotate, and scale an object.
Polygon Basics
First make sure you’re in the “Polygons” toolset.
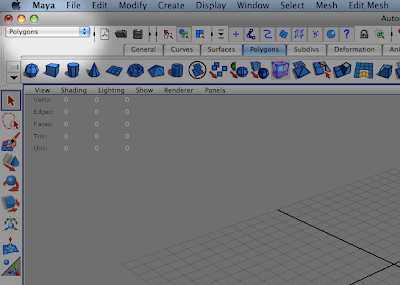
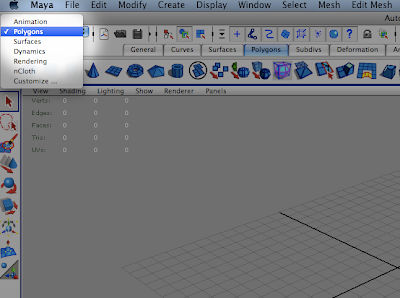 Now, create a polygon cube. Either go to the menu create > Polygon primitives > cube, or if you have the Polygons tab selected above the view panes, click the cube icon.
Side note: The box next to menu objects is to bring up an options menu. For example, if you clicked on the box next to polygon cube, you would get an options menu for initial scale, u and v divisions, etc.
Great, your cube has been created. You should be all set. Look at the toolbox on the left side of the screen and find the Select, Translate, Rotate, and Scale tools. For right now, don’t worry about the ‘select’ tool, because you can select objects with the other tools as well. Try translating, rotating and scaling your cube to familiarize yourself with how the tools work.
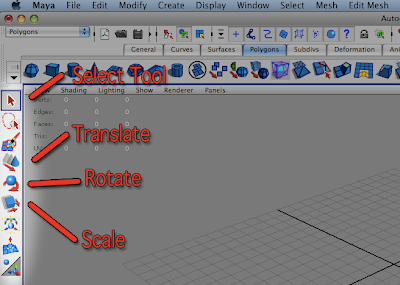 Important shortcuts:
Select tool q
Translate tool w
Rotate tool e
Scale tool r
Tip:
Look how easy Maya is to control if you keep your left hand in this position:
 Your fingers have immediate access to the select, translate, rotate, and scale tools.
Your thumb has quick access to the spacebar for changing your viewmode and the alt key for moving the camera
Attributes Editor, Tool Settings, and Layer Editor
Ok, three more things we should review before getting to the good stuff. Find these three icons:
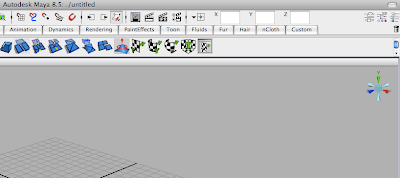 While mousing over those three icons, notice the hints box at the bottom left of the Maya window. The hints box comes in handy!
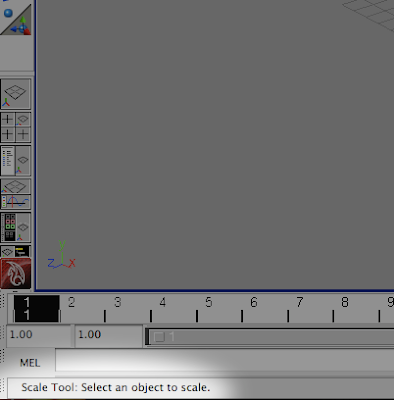 Well, explore those three menus on your own, lets get to building a poly house!
Building a Poly House - Rough Shape
Go ahead and open up a new scene.
Bring up the Layer Editor
Create the following layers: ground, snap_planes, and house
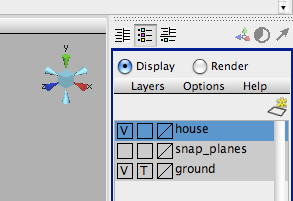 Create a plane - this will act as our ground
Open up the Outliner (Window > Outliner)
Notice how we have pPlane1 selected.
Double click to rename it to ground. Maya doesn’t like any duplicate names, so it will be automatically renamed to ground1.
With ground1 selected, right click and ground in the Layer editor and select Add selected objects…
Hide the ground layer by clicking on the v next to the layer.
Create another plane
In the outliner, rename it (the new pPlane1) to xz.
Create another plane
Open the Attribute Editor
Set the x rotate value to 90
In the outliner, rename it (the new pPlane1) to xy.
Create another plane
In the Attribute Editor
Set the z rotate value to 90
In the outliner, rename it (the new pPlane1) to yz.
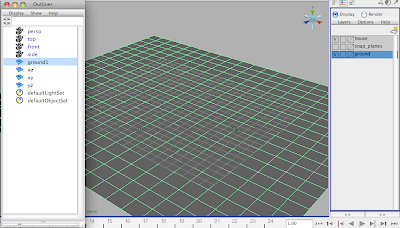
Select all three (either via the Outliner, or drag boxing over them in the persp view)
Open the Layer Editor
Add the selected objects to snap_planes
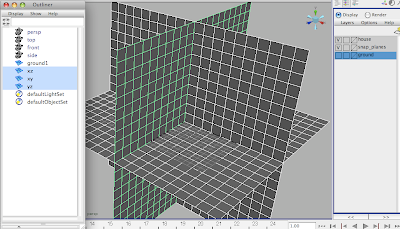
Hide the snap_planes layer
Show the ground layer (click where the V used to be, to make the layer, and the V, visible again).
Click the box next to the V until an R shows up. This allows you to see the layer, but not edit it.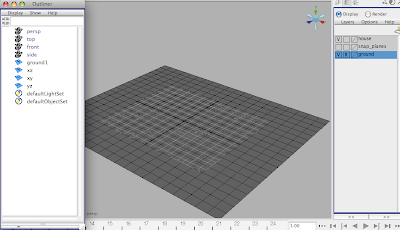 We will now begin creating the house…
Create a cube and rename it ‘polyHouse’.
We want the cube to sit on the plane. To do this exactly, we have to move its pivot point.
Translate the cube above the ground.
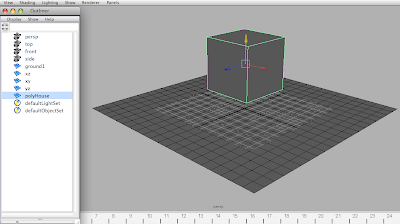

 Hold down the ‘d’ key. Notice how the translation selection has changed to signify that you are now moving the pivot.
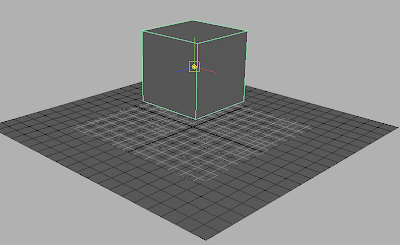 While holding ‘d,’ also hold the ‘v’ key. Holding ‘v’ allows you to snap to vertices (corners of polygonal faces).
Click on the green line (which will constrain movement to only the y direction), and drag you cursor over one of the bottom vertices of the cube.
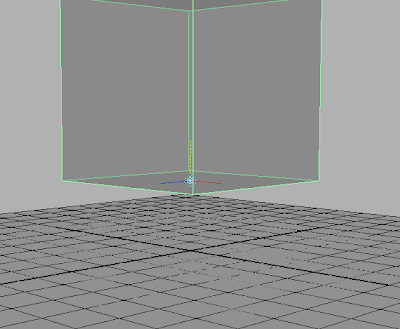 Now, release the ‘d’ key and use the same technique to snap the cube to the ground.
Hide the ground and reveal the snap_planes layer. It would be useful to make the snap_planes layer un-selectable.
Right click and hold on the cube to bring up an edit menu. Move your cursor over vertex, and release.
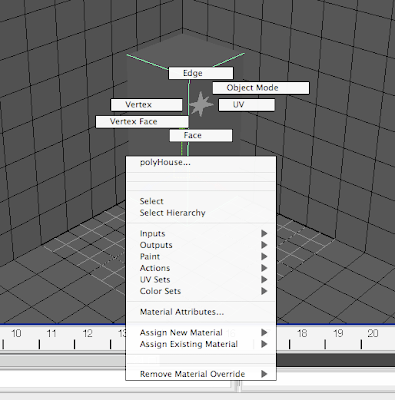


 Using the different orthographic views, snap the vertices so that the cube is a rectangular shape for our house.
Now, bring up the right-click menu and choose ‘Face.’
Select the top face. We will start constructing the roof of our house.
Now, go to Edit Mesh > Add Devisions and click on the options box.
In the divisions menu, make your selections match these:
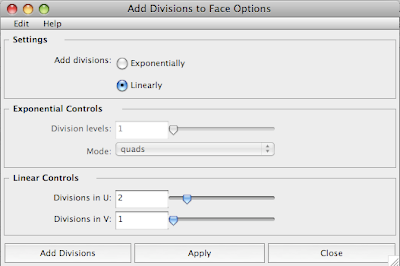 Click apply and close the options window. Now the top face of the cube should be split exactly down the center.
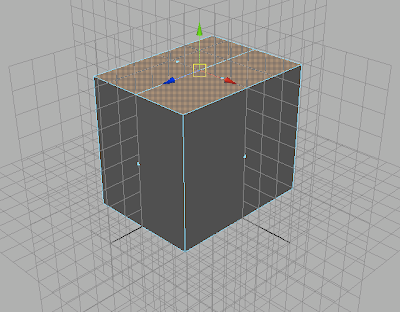 Now, switch back to editing vertices, select the two new vertices created by the division. Move them upwards using vertices snapping to make the a rough outline of a house.
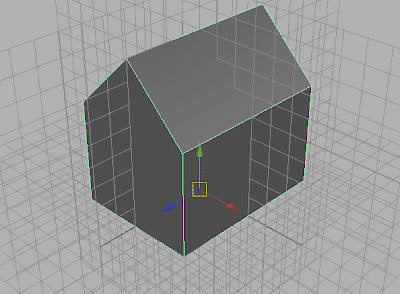 That is all for part 1 of the tutorial, hopefully we will get farther in class tomorrow!


Before we start, just know that when starting out, Maya can be very daunting. Not to worry! Making 3D stuff is fun as long as you understand you won’t be making Shrek on your first day.
Ok first thing first: open Maya.
Now that Maya is open, you have a slew of menus at the top of the screen, tons of icons in multiple trays, and a tool box on the left. Lets learn how to use the view panes.
Navigating the View-panes
Alright, in front of you should be a big window with a grid in it. This is the perspective window (labeled “persp” in green at the bottom). Let’s learn how to Rotate, Pan, and Zoom the persp camera. It’s easy!
Hold down alt (or cmd on mac),
Left click drag to rotate
Middle click drag to pan
Right click drag to zoom
In the future, this may not be good enough for modeling. We need orthographic views! Under the toolbox on the left side of Maya, find the icons for the different Maya layouts.
 Choose the Orthographic (Ortho) views. Your screen should be split into four windows now: top, persp, front, side. Excellent, this should make modeling easier. But we don’t need to be in this viewmode all the time, so mouse over the persp window and tap the spacebar.
Shortcut: tapping spacebar will maximize whatever view you were moused over in orthographic viewmode, or return you to orthographic view mode.
Now that you know how to manipulate the camera, and move through the different view modes, let’s learn how to create, translate, rotate, and scale an object.
Polygon Basics
First make sure you’re in the “Polygons” toolset.

 Now, create a polygon cube. Either go to the menu create > Polygon primitives > cube, or if you have the Polygons tab selected above the view panes, click the cube icon.
Side note: The box next to menu objects is to bring up an options menu. For example, if you clicked on the box next to polygon cube, you would get an options menu for initial scale, u and v divisions, etc.
Great, your cube has been created. You should be all set. Look at the toolbox on the left side of the screen and find the Select, Translate, Rotate, and Scale tools. For right now, don’t worry about the ‘select’ tool, because you can select objects with the other tools as well. Try translating, rotating and scaling your cube to familiarize yourself with how the tools work.
 Important shortcuts:
Select tool q
Translate tool w
Rotate tool e
Scale tool r
Tip:
Look how easy Maya is to control if you keep your left hand in this position:
 Your fingers have immediate access to the select, translate, rotate, and scale tools.
Your thumb has quick access to the spacebar for changing your viewmode and the alt key for moving the camera
Attributes Editor, Tool Settings, and Layer Editor
Ok, three more things we should review before getting to the good stuff. Find these three icons:
 While mousing over those three icons, notice the hints box at the bottom left of the Maya window. The hints box comes in handy!
 Well, explore those three menus on your own, lets get to building a poly house!
Building a Poly House - Rough Shape
Go ahead and open up a new scene.
Bring up the Layer Editor
Create the following layers: ground, snap_planes, and house
 Create a plane - this will act as our ground
Open up the Outliner (Window > Outliner)
Notice how we have pPlane1 selected.
Double click to rename it to ground. Maya doesn’t like any duplicate names, so it will be automatically renamed to ground1.
With ground1 selected, right click and ground in the Layer editor and select Add selected objects…
Hide the ground layer by clicking on the v next to the layer.
Create another plane
In the outliner, rename it (the new pPlane1) to xz.
Create another plane
Open the Attribute Editor
Set the x rotate value to 90
In the outliner, rename it (the new pPlane1) to xy.
Create another plane
In the Attribute Editor
Set the z rotate value to 90
In the outliner, rename it (the new pPlane1) to yz.

Select all three (either via the Outliner, or drag boxing over them in the persp view)
Open the Layer Editor
Add the selected objects to snap_planes

Hide the snap_planes layer
Show the ground layer (click where the V used to be, to make the layer, and the V, visible again).
Click the box next to the V until an R shows up. This allows you to see the layer, but not edit it.
 We will now begin creating the house…
Create a cube and rename it ‘polyHouse’.
We want the cube to sit on the plane. To do this exactly, we have to move its pivot point.
Translate the cube above the ground.


 Hold down the ‘d’ key. Notice how the translation selection has changed to signify that you are now moving the pivot.
 While holding ‘d,’ also hold the ‘v’ key. Holding ‘v’ allows you to snap to vertices (corners of polygonal faces).
Click on the green line (which will constrain movement to only the y direction), and drag you cursor over one of the bottom vertices of the cube.
 Now, release the ‘d’ key and use the same technique to snap the cube to the ground.
Hide the ground and reveal the snap_planes layer. It would be useful to make the snap_planes layer un-selectable.
Right click and hold on the cube to bring up an edit menu. Move your cursor over vertex, and release.


 Using the different orthographic views, snap the vertices so that the cube is a rectangular shape for our house.
Now, bring up the right-click menu and choose ‘Face.’
Select the top face. We will start constructing the roof of our house.
Now, go to Edit Mesh > Add Devisions and click on the options box.
In the divisions menu, make your selections match these:
 Click apply and close the options window. Now the top face of the cube should be split exactly down the center.
 Now, switch back to editing vertices, select the two new vertices created by the division. Move them upwards using vertices snapping to make the a rough outline of a house.
 That is all for part 1 of the tutorial, hopefully we will get farther in class tomorrow!

cool looks good so far i do like the maya tutorial
ReplyDelete