


I’ve had the idea of a ‘stave-off-boredom’ game for a while now. I was inspired partly by mafia wars on facebook. I also played a 'game' in middle school with some of my classmates. At the beginning of a class, we would enter 1 + 1 into our calculators, then frantically tap the equals button. This would repeatedly add one to the sum. Whoever had the highest number at the end of class was the winner. Thus, years later, Dodgeball Fighter was born. Originally, I had wanted to create a windowless desktop app. I planned on making Dodgeball Fighter in Flash, but the only way to make windowless swf files are through some third party programs that would have been cost prohibitive. Thankfully, I have dashcode installed, which set up to create dashboard widgets. I had also used Quartz Composer a few years ago. As it turns out, Dashcode can integrate Quartz compositions into dashboard widgets fairly easily.
The majority of the scripting was trial and error. I came across two sets of constraints: scripting in Quartz, and widget ‘conventions.’ Scripting in Quartz was particularly challenging, because there is no concept of variables as objects instead of just messages (or if there are, I didn’t find them). This made it difficult to complete simple “if x then y” type statements. Also, I had planned on having fighting sound effects that would relate to the hit and combo counters, but after further consideration, sounds would be too disruptive in a dashboard widget.
All of the main code is actually within the lighting object on this layer. Everything within the lighting object is affected by the light.
This is the main guts of Dodgeball Fighter. I had everything neatly arranged into macros, but I had to expand everything out again when implementing the combo counter.
This is the old shadow macro. I wasn't able to get the alpha to work correctly on the texture, so I replaced this with the reflection sphere.
Several things have changed since I presented the project. Originally, the dodgeball started out being colored red, then caught fire after 100 hits. Now, I have implemented a combo counter that appears in the lower left corner if the player strings together a series of killer clicks. The dodgeball now starts out grey. When the combo counter hits 10, the dodgeball turns blue as it heats up. At 20, the dodgeball turns purple. At 30, the dodgeball turns red. At 40, the player has caught the dodgeball on fire! The player is also able to reset the total hit counter by clicking on the info button at the bottom of the widget. All in all, Dodgeball Fighter is clicking for the sake of clicking.
Here is a link so you can download and play Dodgeball Fighter:
http://www.prism.gatech.edu/~gth771s/LCC4730/MikeRoth_Project4.dmg
 Choose the Orthographic (Ortho) views. Your screen should be split into four windows now: top, persp, front, side. Excellent, this should make modeling easier. But we don’t need to be in this viewmode all the time, so mouse over the persp window and tap the spacebar.
 Now, create a polygon cube. Either go to the menu create > Polygon primitives > cube, or if you have the Polygons tab selected above the view panes, click the cube icon.
 Important shortcuts:
 Your fingers have immediate access to the select, translate, rotate, and scale tools.
 While mousing over those three icons, notice the hints box at the bottom left of the Maya window. The hints box comes in handy!
 Well, explore those three menus on your own, lets get to building a poly house!
 Create a plane - this will act as our ground

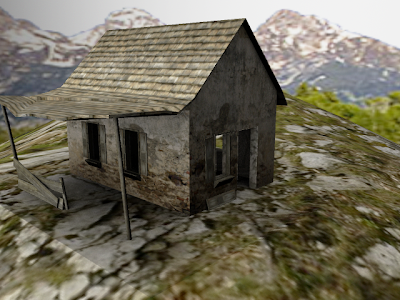
 We will now begin creating the house…
 Hold down the ‘d’ key. Notice how the translation selection has changed to signify that you are now moving the pivot.
 While holding ‘d,’ also hold the ‘v’ key. Holding ‘v’ allows you to snap to vertices (corners of polygonal faces).
 Now, release the ‘d’ key and use the same technique to snap the cube to the ground.


 Using the different orthographic views, snap the vertices so that the cube is a rectangular shape for our house.
 Click apply and close the options window. Now the top face of the cube should be split exactly down the center.
 Now, switch back to editing vertices, select the two new vertices created by the division. Move them upwards using vertices snapping to make the a rough outline of a house.
 That is all for part 1 of the tutorial, hopefully we will get farther in class tomorrow!
